Sunday, December 28, 2008

Our Winter Chickens


Our girls have come a long way since the first group arrived in July. They have established a definite “pecking order”. The head chicken made herself known on the first day. The others were skittish and nervous, but not this one. She ran up and immediately pecked my shoe. She has always been the first on the scene for treats and the first to react if another hen gets any attention. She’s just an “in your face” kind of gal!

All of the chickens come running when they hear me near, looking for treats, but “Queen Hen” is always in front. For the most part, the other hens go about their business but keep an eye on me in case I might suddenly start throwing treats around for no reason.


“Queenie” stays with me the entire time I am in the coop. She hops up on the perch behind my head and watches closely as I collect the eggs. Today for the first time, she gently pecked the back of my head when I was facing away from her. I knew it was her, wanting my attention. She’s a hoot! Another chicken is always there, as well, but she is more curious about what I am doing than wanting my attention. Whenever I set the eggs down, she has her little head in the bucket to see what I have in there, just in case it might be treats. You never know when treats are going to suddenly appear out of nowhere!


The rooster just watches from the sidelines (Isn't he beautiful!) and won’t take food from my hand. He is far too dignified for that! He will eat it if I set it down beside him on the perch. This doesn’t work if he’s on the floor, as he is always surrounded by voracious hens who don't think they ever get enough to eat. They are fed all day long with complete layer feed and constant goodies chopped from the kitchen. Of course, it all has to be chopped. They don’t seem to know what to do with anything whole. They are very spoiled.


The “girls” are bored with being “cooped up” for the winter. The roof of their pen collapsed with the first heavy wet snow so we let them out to free range when the weather is still and not too cold or windy. They are brown and so are prime targets in the snow for hawks in the daytime. I do leave the radio on in the chicken house when they are awake, hoping it will help deter a daytime predator. I think this gives them some company too and might help keep them from getting so bored. We have had some severely cold (-20c) days this month when I have had to leave them inside with the light on. I am now looking for some old windows I can install to give them more daylight and a view of the outdoors when they are all closed up.

I gave them a whole cabbage last week, as I read that this is a good thing to do for entertainment when they are shut up in the winter. They did show some interest in it, especially when I peeled off the leaves and broke them up into tiny little pieces. (These girls are really spoiled.) They didn’t seem to know what to do with this now half-frozen cabbage ball I left on the floor. After a few days of this and being covered in poop, it went into the compost pile.

When I let them out I have to shovel a space for them in the snow, as they don’t like walking in it. (Did I mention that they are spoiled?) I’m sure their wild ancestors didn’t need the snow shoveled for them. They love to be under the deck in the winter. The snow doesn’t penetrate there and it’s covered with old hay. They can scratch around and find stones and bugs to eat. They’re welcome to eat all the bugs they can find. Especially spiders. We seem to get a lot of those in the house in the winter. I do, of course, have to shovel a path to the deck for the little princesses.
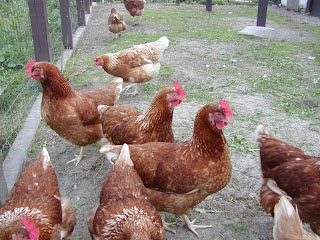
Here they are going along the path from the hen house to the deck. Occasionally one of them will discover that she can fly over the snow. Then a few more will do it. They invariably land in deep snow and don’t seem to know what to do. I usually have to rescue them, so I keep a close eye on them when they are on their way to the deck. The last time I let them out I just watched. The “stuck” ones did manage to walk across the top of the snow to the path. It took them a few minutes to figure it out though. They REALLY don’t like snow. Living in the great white north, I should probably trade them in for some geese or ducks who are at home in the winter weather. I have read that duck eggs are rich and delicious. Watch out little princesses!

They have just recently discovered the front porch, unfortunately. They like it there too. They can roost on the railing and are protected overhead. I was quite annoyed to find little chicken poop piles on the front porch when I came home from work last week. Hubby says he came home and found the chickens all over the porch. He seemed to think this was “cute”. He loves those chickens! Usually the snow is not shoveled enough from the hen house to the porch, so they haven’t been going in that direction, until last week. I now make a point of not clearing the snow in that direction and it has kept them away. I trip, slide and fall all the way there, but hey, I’ll gladly trade that for little chicken poop piles on the front porch. The same thing happened when they found the shop/garage in the fall. We had to start keeping the 
door closed.

We will be repairing their pen as early as possible, before the spring. They will have to be restricted to their pen after the garden is planted or they will destroy it, scratching up the seedlings and eating the seeds. I think I’m going to repair it sooner than that. I will, of course, have to keep it shoveled out for them. I have considered putting some perches in the pen. I may do that now so they can sit up there in the winter sun, out of the snow. They are so spoiled. Did I mention that?

These days all of the chickens are laying.
Even with the short days, we are getting 15-18 eggs per day from 20 chickens. We waited for the numbers to drop off with the short days, but they haven’t. Odd that… Could it be because I am there early, turning on the light to collect the eggs and waking many of them up? I hear the rooster crowing inside the house at about 5:30 am, announcing the morning, in the dark. We recently started getting the odd, small, light coloured eggs from a first time layer, so we are sure everyone is laying now. No one seems to be severely picked on, at the bottom of the “pecking order”, thank goodness. Hens can be mean to a newbie. They all seem to know their place most of the time, although a couple of the younger ones are still sleeping on the floor and not with the group. The occasional problem develops when treats are not plentiful and are being parceled out carefully or someone steps out of line. Then I hear squabbles, but they are short lived.

All in all, they have settled nicely into their new home. What would they do, I wonder, if I added a few ducks… "Ducks! Yikes!"

Saturday, December 27, 2008

Our Farm Dog


This is Barnard Edward Gallant (BEG). Also known as Begedy, Barns or Barney, for short. He is our 14 year old shi tzu/ bichon farm dog. I know what you’re thinking. “This is a farm dog?” I, too, have visions of a Great Pyrenees when the phrase “Farm Dog” is mentioned. I would love to have a Great Pyrenees! Alas, it’s not to be, not this year, anyway. What we have is an “indoor” farm dog.


He loves to follow me around the garden, sniffing and digging in the dirt and tracking it all in the house. He has learned to follow the basket around the garden and steal things out of it. He learned that from the new little shi tzu puppy we had for a short time. Who says you can’t teach an old dog new tricks? He loves all things from that basket: peas, corn, beans, anything. (I have to be careful not to leave it on the floor when I bring it in.) If it comes out of that basket, it’s got to be better than anything he’s ever eaten before!

Our very own Easter bunny! We have considered raising rabbits for food. This is a test...do we like rabbits? Hmmmmm, I think so.


Not a winter dog!

When he was a young dog, he was a force to be reckoned with. Well, I guess we all grow old and mellow with time. He did show some interest in the chickens when they first arrived, for about an hour. After that he acted like he had lived with them all of his life and couldn’t we please get something a little more interesting? We let the chickens out of their pen from time to time and watched him closely with them. He looks at them in the yard but then goes on his merry way. It would be way too much trouble to catch one of those and who wants one anyway?

He did have a close encounter with one of our lead, assertive hens for the first time last week. This is where the fierce farm protector instinct came in. She pecked him when he got too close, so he backed off. She was blocking the door to the front porch, so he stood and whined until one of us moved the hen out of his way.
So much for our “Livestock Guardian Dog”. Has anyone ever had a “Livestock Guardian Chicken”?

Monday, October 13, 2008

No till, 'Lasagna', gardening


Lasagna gardening is a no-dig, no-till organic gardening method that results in rich, fluffy soil with very little work from the gardener. The name "lasagna gardening" refers to the buildup of layers of organic material on top of cardboard or newspaper, also known as 
“sheet composting."


One of the best things about lasagna gardening is how easy it is. You don't have to remove existing sod and weeds or dig at all. The first layer consists of either brown corrugated cardboard or at least six layers of newspaper laid directly on top of the grass or weeds in the area you've selected for your garden. Wet this layer down to keep everything in place and start the decomposition process. The grass or weeds will break down fairly quickly because they will be smothered by the newspaper or cardboard, as well as by the materials you're going to layer on top of them. This layer also provides a dark, moist area to attract earthworms that will loosen up the soil as they tunnel through it.


It's a great way to get rid of your lawn. If you're on a reasonably small city lot, what do you need grass for anyway? It has no practical value and takes a lot of chemicals poured on it to keep it looking nice. Mark out the paths you want to make, curved of course, and where you want the trees, benches, large shrubs and structures-fountains-pond in your park garden. Then cover the area with cardboard and layer the organic materials on top of it. You can first plant the large items and cover the ground around them with the cardboard, before adding the layers of organic material. Then plant the smaller things immediately or do this in the fall and leave planting of small items until spring when they will grow down through the soft and composted cardboard. When done this way and kept heavily mulched, your yard will take very little care, and no mowing. Plant closely to keep weeds from taking seed and growing. Thick mulch will also help with this.


It has been my experience that cardboard works better for the prevention of grass and weeds than newspaper and, for us, is easier to come by. You will need many sheets of newspaper to keep the grass from growing through. While you don’t need to remove sod, grass or weeds, I would remove large rocks. They make great stepping stones in an ornamental garden.


We used cardboard and old hay to make our new strawberry and asparagus beds 
shown here.

We bought only a dozen everbearing strawberry plants in the early spring, and they have reproduced themselves over the summer to approx 50+ plants and are still spreading. We are very pleased with their growth rate this year!

The new asparagus plants are only about 8-10" tall but we have high hopes for them! We have planted approx 50 new babies of each, asparagus and strawberries, giving them lots of mulch and room to grow.


This is our current asparagus, in September, with cardboard around the base, which we will top with other compost as the winter wears on. Soon it will be time to cut it back and mulch for the winter.


This is what happens when you make a strawberry bed where the peas were earlier... Oh well, we'll have another late crop of peas, I guess. We do like 

gardening surprises!

The layers on top of the cardboard can consist of any organic material that does not contain any protein (fat, meat, dairy or bone). Old hay, straw, leaves in the fall (rescue these form the curbside of friends and neighbors), kitchen compost, sawdust, a little wood ash, manure, peat, and any other organic material you can find. Materials will vary in each individual's garden according to what is available locally. I have heard that seaweed works very well but you may need to rinse the salt out first.

When you're planting a lasagna garden, no digging is required. For transplants, simply pull back the layers of mulch, drop in the plant and pull some mulching materials back over the roots. Sowing seeds is easy, too. Sprinkle a little finished compost over the area you want to plant, sow the seed, and cover it with a little more of the finished compost. Press down on the bed to secure the seeds and water thoroughly.

Lasagna gardening is definitely the way to build vegetable or flower beds! We use this method for both. While we do still use a tiller for the vegetables, we are slowly moving away from it. Because it uses no power tools, heavy equipment or expensive commercial additives, lasagna gardening is an easy way for people with space, age or physical limitations to maintain garden productivity.

Thursday, October 9, 2008

Wild Mushrooms


"Shaggy Mane" Mushrooms are blooming like crazy right now in September. They are only good for an hour or so after picking, so we don't sell them. I have considered selling jars of starter to those who want to grow these themselves. These are delicious as babies, prepared in casseroles, especially with fish. Due to their high water content, they don't do as well sauteed.


They aren't here for long, though, so we take advantage of it while we can.

While these are not the "Alcohol Inky Cap" shaggy mushrooms, it is not recommended to drink alcohol while eating them. They can sometimes contain a substance that prevents the body from detoxifying alcohol and can cause tingling, flushing and rapid heart beat. These symptoms disappear after a few hours.


These mushrooms are also known as "ink" mushrooms and, indeed, do produce a black ink when mature, that has been used for writing and drawing, in the past. I have not tried this, but may do some mushroom drawings with the mushroom ink. Interesting concept...


We have several other types of mushrooms on the property, but all are not edible. There are a few of the tiny Coprinus-plicatilis, sometimes called the "fairy parasol". Cute little thing and poisonous. It is also sometimes called a "Japanese umbrella" mushroom.


These are also growing on our property,I believe they are Tricholoma lascivum. They grow in bunches where the shaggy manes grow, in the cut grass area at the edge of the pasture.


Homemade Soap


Homemade, natural soap is a luxuriant pleasure to use. We make a large variety of soaps, with many ingredients grown right here on the farm. Some of our soaps are vegan soaps and are made from all vegetable oils. Other soaps are made from animal fats, which make them harder and longer lasting. We specialize in herbal, healing soaps made with oils, infused with herbs directly from our own herb garden.


We are gearing up to make soap that will be ready to purchase for Christmas and should be ready in mid November. Handmade soaps make great stocking stuffers or buy a dozen different bars as a special present. Soap is a gift that anyone would love, male or female, and is impersonal enough for the office party. We sometimes make special scents, like peppermint, for Christmas soaps.

To answer the question most asked by our customers. Yes, we use lye to make soap. To put it simply, without lye there's no soap - period. If the ingredients say "sodium", that's lye. Sodium hydroxide is lye and it is a natural ingredient made from hardwood leaves or ashes (we buy our's). The term "natural" has been mistakenly used to mean "good for you" when that is not necessarily the case. Lye is a "natural" ingredient that is dangerous and can cause sever burns if one is not careful enough in it's use. After it goes through the soap making process, it is no longer lye and is not at all harmful. The combination of lye and fat under very specific conditions, causes a chemical reaction called "saponification" which makes both the lye and fat into one item: soap. It is no longer lye or fat and doesn't contain either one. Superfatted soaps have some fats added in after they become soap. Glycerin is a byproduct of this chemical reaction. The glycerin is what makes homemade soap soothing and moisturizing.

Our homemade soaps contain all of the moisturizing natural glycerin produced by the soap making process. Most of the glycerine has been removed from commercial soaps and sold separately. Glycerine is used in the manufacture of weapons and explosives and is worth more than the soap. This is one reason why commercial soap dries your skin. Other reasons for this are the additives to preserve it's hardness in water, colour it, make it produce more lather, etc. etc. All of these additives are unnatural chemicals and are not gentle on your skin. So called commercial "glycerin" soaps have only a fraction of the glycerin added back into them during their manufacture, then boiled with alcohol to make them clear. None of this comes close to the soothing use of handmade soap in it's natural state.

An additional "plus" for homemade soap is it's benefit to the environment. It does not contain phosphates and is safe for the water supply - perfect for camping. It is also safe to use on pets.

Our herbal healing soaps contain thyme and oregano, among other things. Thyme and oregano are both antibiotic and anticeptic, which make them excellent healers of acne and other skin problems. Try the healing herbal soap for a few weeks and make up your own mind.

Another useful soap that we offer is Coffee, for hard to clean shop hands. Coffee soap will remove even gasoline smells from your hands.

We make foot soaps with a salt scrub instead of pumice. Salt will scrub off the dead skin while losing some of it's own sharp edges as well. This makes it a safer and much more gentle scrub for feet that are already in bad shape.

We make soaps with oatmeal for a facial scrub, sometimes with vanilla.

We also make beauty body bars that smell nice. Some have our own blend of scent called "Providence".

Chickens and Fresh Eggs


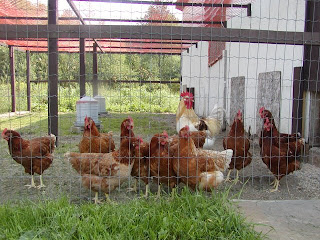
We now have 20 cage free chickens and one rooster. We started with a doz hens and the rooster then recently added eight more hens to make an even twenty. They are all red sex-link chickens - a blend of "Rhode Island Red" which are great eggs layers and "White Rock" which are good meat birds, making them "dual purpose". They are called this because they can be "sexed" at birth by their colouring. We are getting approximately18-20 large brown eggs every day. We sell them for $2.50 doz/large. If you are in the Barrie/Innisfil, Ontario area and are interested in purchasing eggs from us, please just send us an email. Our chickens are penned most of the time, although we do plan to let them free range some under our gaze, usually every evening after work. We have the Simcoe County Forest on two sides of our property and we have hawks, eagles, coyotes, wolves, foxes, skunks, raccoons, minks and weasels in this area, all of which eat chickens. There have also been recent cougar sightings. They wouldn't last very long if we let them run free all day and all night.

Did you know that eggs from hens raised on pasture compared to factory-farmed hens contain more of the good stuff and less of the bad stuff? They have 1/3 less cholesterol, 1/4 less saturated fat, 2/3 more vitamin A, 2 times more omega-3 fatty acids, 3 times more vitamin E, 7 times more beta carotene - Source:
http://www.motherearthnews.com/

Our chickens get a varied, natural and healthy diet. They free range, weather permitting, for a few hours at the end of each day while we are home. Even penned, they get a natural and varied diet. We feed them lots of greens daily. They love fresh green grass and dandilions. They have learned to like the tractor and lawn mower because those loud machines blow fresh cut grass into the pen. We also have an abundance of "Queen Anne's Lace" (wild carrot) that they like. They get the shaggy mane mushrooms that get too old to eat and they LOVE those! There are a lot of grasshoppers and crickets and tiny toads/frogs that cross that pen on a continuous basis, that make excellent snacks for them. It's quite intertaining to watch the chickens run after them. Those gals gobble up anything that comes into their range! They get a lot of the zucchini that we don't use. We let any extra zucchini (and there are a lot of them) get really big and seedy, then pick them and slit them in half. The gals will have those shells cleaned out in a matter of minutes - ditto for watermelon and squash. They get all the dried out old breads that have not begun to go moldy yet (mold will kill a chicken fast!) and clean up from the garden. They really like bean leaves. They have eaten an 8" row around the outside of the fence. That's as far as they can reach through the fence and they keep it trimmed. All of this to say that our chickens are very healthy and couldn't get a better diet if they did run free 24/7. This makes for great eggs! Large, hard shelled and very tasty! This isn't all they eat, of course. We do make sure they get the calcium they need to meet their daily nutritional requirements whilte laying eggs.


We have one rooster and he is beautiful, with a personality to match. He is still young, only about 8 mos old right now, but he does his job. He is quiet and unassuming, always giving way to the hens, never pushy or agressive. He eats when he's sure it is safe to do so and watches over his ladies as they eat.


His lovely crowing song is beautiful to hear in the early morning. He crows, not only in the morning, but at any alarm or announcement, all day. We are hoping that he will retain this sweet personality as a full grown adult with spurs. His spurs are not quite 1/2" long yet. He has twenty hens to himself, so, hopefully, there won't be any mating injuries to the hens from the spurs. Time will tell.

The rooster is not necessary to have eggs. Hens lay eggs every day without a rooster. Because we have a rooster, doing his job, our eggs are fertilized, but an everyday consumer of eggs would not be able to tell the difference between fertilized and non-fertilized eggs. Baby chicks only form in fertilized eggs under specific conditions, and room temp, or cooler, is not warm enough. Fertilized eggs need to be under a heat lamp or a hen for three weeks in order to hatch baby chicks. If the heat is not there and constant - no baby chicks form and the fertilized eggs are no different than the others.

We have one hen that lays huge, double yolked eggs. We get a few of these every week. You can see the difference in size in this picture. These eggs don't fit into the cartons. We give these as "special" gifts to friends and regular customers.


Our chicken house is a large wooden shed with a wooden floor and insulated. It was here when we came and very well built. We actually have two of them, side by side, both attached to the outside pen with a door. We only use one for the chickens. The other one is for dry, clean storage of food and bedding for the chickens and other things we want to keep dry and clean, 
like kindling.


These are our hens going to bed at night. Most of them sleep on the roosts but there are a few who prefer the floor. The nesting boxes are in the corner behind the camera. We shut them in at night to protect them from predators. Most chicken predators are nocturnal, thank goodness. We let them out into their large pen every morning at dawn or earlier in the winter months, provided the day is warm enough in the wintertime.


We believe that raising chickens on deep litter is the healthiest and easiest way to keep the hen house from building up ammonia. It needs cleaning a lot less than anything else. Keeping 4-6" of wood based litter on the floor of the chicken house helps to absorb the nitrogen from the chicken waste, since wood uses up nitrogen as it decomposes. We often use shredded computer paper as bedding. Shredded and dry autumn leaves make good bedding too, when wood chips or shavings are not available. Both computer paper and leaves are wood based. The chicken manure and wood litter decompose together. I rake it over and add more wood litter as the weeks go by, keeping it turned and mixed, just like I would a compost bin. The hens help with this too, scratching in it for food bits. As long as there is wood based litter added to it every couple of weeks and it is turned regularly once a week or so, there is no ammonia smell. I can tell when it needs to be raked and more added, when I open the pen door in the morning. If I can smell ammonia outside the pen, it needs attention. The warm farm manure smell is always there, but it's a healthy natural smell. Other things to keep in mind when keeping the smell down are the number of chickens per sq ft of housing and enough ventilation in the hen house. The deep composting litter on the floor will also help to keep the hen house warm in the winter. We clean out the chicken house litter approximately once every 4-6 weeks. After it is aged for a season, it is fabulous in the garden!

We have one chicken who is free-range. She is a lot younger than the others and is not laying yet, so they pick on her. There is a definate hierarchy among the hens. Also, the hens who have more aggressive personalities get what they want more often. Our one free range hen is not laying yet and that puts her on the bottom of the "pecking order". The older hens chase her away from the door, not letting her outside and they keep her away from the food and water. She has such a sweet personality and is totally non-aggressive. She just hides her face in a corner and stays in a nesting box all day, if allowed to stay with the other hens. This makes the nesting boxes dirty and the eggs poopy when gathered. Normally, hens don't foul the nest and usually keep them clean. Until she is old enough to hold her own and she is laying eggs, she stays in the porch entrance to the hen house during the day. She has a nesting box there but doesn't use it yet. When it is time to shut them up for the night, I put her on a roost inside the hen house where it is warmer and do some training by protecting her and teaching the other hens that it is NOT FUN to pick on her. Then I turn the light off and leave them. She is always still on the roost, pacing, when I let them out in the morning after the others have gone out or are eating. I don't think she has the confidence to get down by herself yet. I put her back in the porch and leave the door open some for her to free range. She is not as safe during the day while we are gone and I worry a little about that but she stays in the cover of the porch a lot and she can fly. She visits with the other hens through the pen fence. She stays nearby and follows them around the perimeter of the pen. So far this seems to be working out. The older hens seem to have accepted her presence outside the fence but still chase her away from the entrance to the hen house. This is a picture of our free range hen in her porch home. She is quite tame and seems to enjoy sitting on my arm where she can hold on.


We have several nesting boxes in the chicken house. One is two story with four on the bottom and two on top, but they don't use the top two. I think this is because there is no roost at the front for them to land on, and then walk into the nesting boxes. I may add this at a later date, if needed. Currently they seem happy with the ones on the floor. I recently added two more to the four they had on the floor and a few hens are using them. The others use the first four, standing in line, waiting for their turn.


I can find 6-7 eggs in one nesting box. I have put some smooth rocks, approx egg size, in all the nests. This was to help train the chickens to use them. The chickens don't know the difference. I have heard of people using golf balls for this and the chickens roll the balls under them and sit on them. I have left them there and added some to the two new nests, as well. Hopefully more chickens will use the new ones in time.

Seed Collecting and Saving


Seeds and Seed Collecting
Seed collecting and trading has become a fine art for us. We feel it is important to offer our nursery customers new and interesting things and to keep current with the newest developments in ornamental plants. We do, of course, keep and dry some of our own vegetable seeds, but we also harvest seeds from the perennials and annuals that we like to grow and trade them to other gardeners around the world. This way we can get a wide variety of interesting and hard to find plants for the garden. The US does not allow plant material across it's borders but I haven't had a problem with seeds, although I've read that others have. Trading plants and seeds with other, mostly European, countries has not been a problem, but shipping costs can be prohibitive for plants.
I collect the seeds and dry them on paper towels on an old window screen on the veranda. Sometimes I write the name on the paper towel. I used to trust myself to remember what it is, but...well, not anymore, so I write it down, if I remember to...


The screen sits over a container to catch small seeds that fall through and to allow air to circulate underneath. The seeds sit on the screen drying and maturing further for a few days, until I remember them and put them away.


It is important to wait until the seed pods are mature. For me, this is the hardest part. The seeds that I collect have dry, brown seed pods when they are ready. If the seed pod is still green and soft, it is not mature enough to pick the seeds. You will have to check them daily to catch the seeds before they are dispersed. Occasionally immature pods will ripen and the seeds will germinate, even if picked early and left to dry, but most seeds needs to ripen on the plant to get good germination rates. In order to have seed pods, you must leave the dead flowers on the plant. Clipping and cleaning up the garden will also clip off the 
future seeds.


I store seeds in regular letter envelopes, seal the long end and tape it securely with masking tape. Then I can cut open the small end and roll it closed and clip with a paperclip. This way I can continue to add more seeds to it as the autumn progresses. Here is a picture of my seed collection thus far this year. The envelopes are labelled with the name and any other information I might want to keep. In this box I can also keep plant labels for new plants, a box of paperclips, tape and a pen. The seeds need to be kept in paper envelopes to stay dry. A container that allows air to circulate will help, as well. Keep it in a cool, dry place. The top of the fridge is too warm and the bathroom is too humid. A plain box serves well for this. A basket with a handle did this job previously and looks so "country cool". I don't know what happened to that basket...

Below are a few of my favourite perennials and annuals that I continue to grow and love. Most of these seeds will need winter stratification in order to germinate. That means that they will need a few weeks of damp winter cold before they will grow. I save these for

 winter sowing.


Winter seed sowing is a great hobby for those of us who hanker for the smell of the Earth and growing things in February, when the world is covered with a sheet of ice and snow. Here in Ontario, winter falls in late Dec or early Jan and we don't see the ground again until Spring, approximately mid March. I keep potting soil in the basement and seed equipment. Any plastic container with a clear lid makes a great winter sewing container. I save those clear, hard plastic cookie boxes from the grocery store and plant in those, after poking holes in the bottom. Then I put these lidded containers out on the deck in the snow and leave them there. They sprout quickly in the very early spring, as soon as the days are long enough. You can obtain winter stratification in the freezer, but it is a lot dryer than the outdoors and doesn't work for eveything. You get much better germination rates by winter sewing. You can also plant these seeds directly in the ground in the fall but they sprout earlier in covered containers. It's like being in a cold frame. Besides...it gives me an excuse to dig in the dirt in the middle of winter. (More about winter sewing when it happens.)

I do have several other perennials and flowing shrubs, but they don't often reseed. The annuals grow to their full potential in the first year and can be reproduced to cover large areas quickly. Below are some that I consider among the best and most beautiful reseeders.

This is impatiens Grandulifera. The big, yellow, fuzzy bumblebees love it! It gets 6 ft tall and looks like this in flower:

The seedpods are sometimes called "touch-me-nots" because, when ripe, they expode if you touch them and scatter their seeds everywhere. You have to collect them carefully. I close my hand, gently, over the entire pod before applying any pressure and try to get all the seeds. Many escape when the bees set them off or the wind shakes it. You can also use a small paper bag closed over the end of the branch, but I have not tried this method. They reseed themselves prolifically and I am always moving them to better places when they come up everywhere in the spring. Due to their height, I keep them at the back of the bed. They look spetacular in large, dense groupings.


This is impatiens Balsamina. It gets about a foot tall and reseeds itself generously. These have exploding seed pods, as well, so have to be gathered carefully.


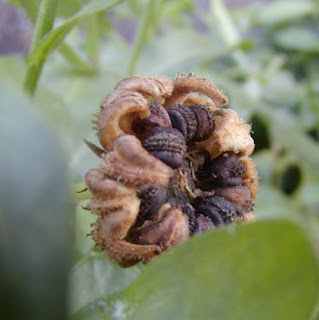
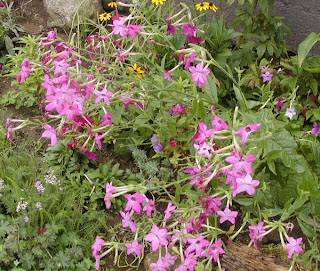
This is pink nicotiana, also called "Nikkies" among gardeners who grow them. Their seeds don't develop until vary late in the season for me, then all at once. The seedpods have begun to mature now.

Lupins are perennials that reseed themselves generously and come is a variety of colours. I have purple (picture at right) and red plants and I also have some pink and purple seeds to plant for next year. The picture to the left is not mine, but they do look just like that.


I love the look of nasturtiums. They are also good and healthy in a salad. They come in yellow, orange and red and look great in planters or hanging over raised edges. They are annuals but grow quickly from seed. These are mine, as of a month ago.


My poppies are annual peony poppies and bloom all summer long. I don't have or care for the perennial poppies that bloom for just a few days and are gone and reseed. My annual peony poppies grow to 2.5 ft tall and come in single, double, and balled. They range from white to dark maroon in colour and every shade of pink in between. These bloom all summer long and reseed profusely. I have an envelope full of seeds from these. Planning where to put them is the hard part. I may scatter whatever seeds I don't use or trade into the field and see what happens. These pictures are not mine, but my poppies look just like that and come in those shades and more.


We occasionally keep the best of the vegetables for seeds, thereby improving our stock with each generation. Some seeds do cross pollinate or do not grow true, but that's the interesting part. We try not to plant vegetables too close together that will cross pollinate. Squash and pumpkins of the same family need to be separated by a large space.

Vegetable seed collecting is fairly straitforward, except for a few exceptions. Cucumbers and tomatoes have to be very ripe when picked and still need to age for a week or two on the counter top, until almost rotten. Then the seeds are collected, put into a container of warm water and left at room temperature to ferment a few days. Stir them occasionally and after about three or four days, strain them, rinse well and dry. All fruit and vegetable seeds need to be collected from fully ripe, if not over-ripe, vegetables and fruit.