This is my pink four o'clock and this is the biggest one I have ever had! I wintered the root over in my cellar with my tender bulbs last winter. It's the first time I have tried it and I will be doing it every year from now on. It really makes a difference in the size! I have seen one house in town that has them 4' tall! I have always known that it could be done but just never bothered until last year.
I LOVE it! It blooms almost right away by the end of June and just keeps blooming until the frost takes it.
 It is very easy to overwinter in the right conditions. If you already grow cannas, callas, dahlias, caladiums or other tender bulbs, you can overwinter four o'clock roots. I treated it exactly the same and it came back this year. I grew new ones this year, as well, a yellow and a white. I will be keeping those over the winter this year too.
Previously, I just grew them new ever year and was happy with them that way. I started them from seed early in the spring and planted them out after the last frost, with the peppers and tomatoes. I only need 3-4 of them so they didn't take up a lot of space growing that way, but this is so much better!
 Mine are solid colours but they come in "broken" colours too. I would LOVE some of those! If you have seeds from broken coloured 4 o'clocks and want to trade seeds, let me know. They need to be all broken colours and not open pollinated with solids near by. It's been my experience that the solid colours are dominate. I have tried it before.
Each year they get bigger. I am hoping the pink one will be 4' tall next year! I don't know where I will put them. I'm rapidly running out of room in the new ornamental garden expansion. I'll have to expand again next year! lol! (It's not funny, really. I haven't finished this one yet.) I already don't have room for all my dahlias.
 Do you grow four o'clocks? Do you keep them over the winter? As practical as I am, I still love my flowers!
I am going to have my four o'clock seed for sale in the seed store this year.
 Below is part of an exerpt from Forager's Harvest. It fit in so well with the foraging post that I had to post it here.
I had no idea that milkweed was even edible! I am going to try them next spring, especially using the silks like cheese!
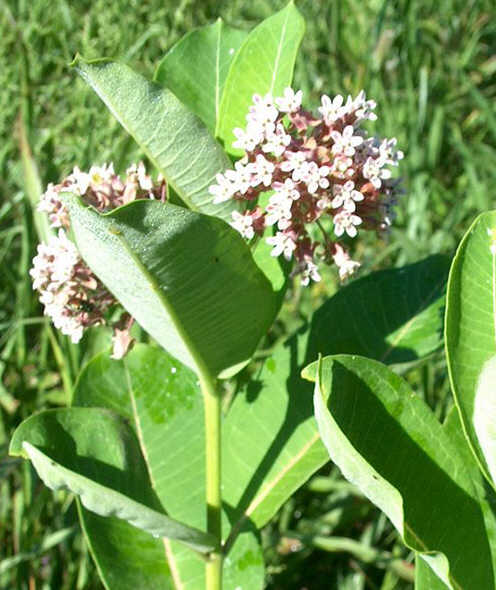
"Milkweed season begins in late spring, just about the time that leaves are coming out on the oak trees, when the shoots come up near the dead stalks of last year’s plants. These resemble asparagus spears but have tiny leaves, in opposing pairs, pressed up flat against the stem. Until they are about eight inches tall, milkweed shoots make a delicious boiled vegetable. Their texture and flavor suggests a cross between green beans and asparagus, but it is distinct from either. As the plant grows taller, the bottom of the shoot becomes tough. Until it attains a height of about two feet, however, you can break off the top few inches (remove any large leaves) and use this portion like the shoot.
Milkweed flower buds first appear in early summer and can be harvested for about seven weeks. They look like miniature heads of broccoli but have roughly the same flavor as the shoots. These flower buds are wonderful in stir-fry, soup, rice, casseroles, and many other dishes. Just make sure to wash the bugs out.
In late summer milkweed plants produce the familiar pointed, okra-like seedpods which are popular in dried flower arrangements. These range from three to five inches long when mature – but for eating you want the immature pods. Select those that are no more than two thirds of their full size. It takes a little experience to learn the knack of how to tell if the pods are still immature, so as a beginner you might want to stick to using pods less than 1 ¾ inches in length to be safe. If the pods are immature the silk and seeds inside will be soft and white without any hint of browning. It is good to occasionally use this test to verify that you are only choosing immature pods. If the pods are mature they will be tough and bitter. Milkweed pods are delicious in stew or just served as a boiled vegetable, perhaps with cheese or mixed with other veggies.
 Silk refers to the immature milkweed floss, before it has become fibrous and cottony. This is perhaps the most unique food product that comes from the milkweed plant. When you consume the pod, you are eating the silk with it. At our house, we eat the smallest pods whole, but we pull the silk out of the larger (but still immature) pods. Open up the pod along the faint line that runs down the side, and the silk wad will pop out easily. If you pinch the silk hard, your thumbnail should go right through it, and you should be able to pull the wad of silk in half. The silk should be juicy; any toughness or dryness is an indicator that the pod is overmature. With time, you will be able to tell at a glance which pods are mature and which are not.
Milkweed silk is both delicious and amazing. It is slightly sweet with no overpowering flavor of any kind. Boil a large handful of these silk wads with a pot of rice or cous cous and the finished product will look like it contains melted mozzarella. The silk holds everything together, so it’s great in casseroles as well. It looks and acts so much like cheese, and tastes similar enough too, that people assume that it is cheese until I tell them otherwise. I have not yet run out of new ways to use milkweed silk in the kitchen – but I keep running out of the silk that I can for the winter!
With all of these uses, it is amazing that milkweed has not become a popular vegetable. The variety of products that it provides ensures a long season of harvest. It is easy to grow (or find) and a small patch can provide a substantial yield. Most importantly, milkweed is delicious. Unlike many foods that were widely eaten by Native Americans, European immigrants did not adopt milkweed into their household economy. We should correct that mistake.
You will find that some books on wild foods recommend boiling milkweed in multiple changes of water to eliminate the “bitterness.” This is not necessary for common milkweed Asclepias syriaca (which is the subject of this article, and the milkweed that most people are familiar with.) Common milkweed is not bitter. Read more on "Milkweed As a Vegetable"... "
I will have these seeds for sale this fall.

This year I began to forage over our property and the adjoining county forest. I am amazed at what I found growing here! We have been blessed with so much that we can use, right here at home, overlooked by most of society!
 The medicinal herbs that grow here are astounding and are just growing wild in the fields! No one uses them, no one harvests them, many don't even realize what they are or how useful and effective they can be. I was one of these people until recently.Now I look at everything with new eyes. I research every plant I find growing here, if I have the time. The medicinal uses of the so-called "weeds" have been a bit of a shock. Now I have screens and armloads of them drying.

There are fruits growing wild here that I have used and will use to make wine, such as the wild grapes, wild red and black raspberries, wild blackberries, choke cherries (top picture), low and high bush cranberries, blueberries, buffalo berries and more.
 There is a large colony of mushrooms here, shaggy manes, that are ranked very high on the list by professional cooks for their flavour. I am expecting these to make their yearly appearance any time now. I have the grass and weeds cut down to the ground in the area where they grow. I intend to cook and freeze them this year. I am also going to attempt to spread them to other areas, more accessible, on the property. They like disturbed ground and I have just the spot waiting for them.
 Also, I believe I have found a few large colonies of ostrich ferns nearby! We will have fiddleheads in the spring!
There are cattails growing in the ditch and I know that their roots are very good baked, as a starch, although I think we will skip that one in favour of potatoes and rice or pasta, for now. They will still be there, if we should ever need them.
I know we could survive here, on our own, self sufficient, in a disaster or when society fails, and that is a comfort. We have medicine growing in the fields, room to grow our own food and plenty of wild food to harvest!
I don't know that anything will happen here anytime soon and I don't mean to sound like a doomsday prophet, I'm just saying...
We have been truly blessed!
Could you survive after a disaster or the fall of society?
(You know you have let go of material possessions when the thought of being self sufficient in a disaster is exciting. Is that a good thing? Hmmmmmm...don't know...perhaps not.)

I picked these crabapples yesterday morning! I drove about 20 mins to a friends house and picked them in the park across the street from her house. There were tons of beautiful, ripe crabapples there! These are the big kind, 1" - 1.5" across! I only need about 15 to 20 lbs to make crabapple wine, which is about two buckets full. I knew there would be a lot of waste, so I picked more than I needed.
 After sorting and cleaning, I had about the right amount. Some were still a bit too green to use for wine, although they would be great for jelly. There is more pectin in the slightly green ones.
The secret to making good jelly and wine from the very tart, wild things is to use only the clear juice, without any pulp in it. Use a very fine strainer or straining bag and do not squeeze it.
It takes about 15-18 lbs of the small, very tart, wild things to make about 5 gallons of wine. This includes, but is not limited to, rhubarb, wild grape, crabapple and choke cherry (which I fully intend to make next year). It probably also includes wild strawberries and a few other things as well.
These things usually have a lot of acid or tannin which is what makes them so tart. So I don't usually add acid to the recipe, although I will for the crabapple, I think. Raw apples, as a general rule, are low in acid. I have a new acid tester now, so I can test the finished juice after boiling and straining and add just the right amount of acid blend to it.
I have enough left to make some crabapple jelly too! (It's TIME that I don't have!) Maybe I will just put those in the freezer for now and make jelly later. No pectin is needed for apple jelly. Apples have a lot of their own pectin. As a matter of fact, you can make pectin for general use from apples and crabapples, if you have enough.
Crabapple Jelly Recipe
8 cups fresh crabapples
water as needed
3 cups white sugar
1.Remove stems and blossom ends from crabapples, and cut into quarters. Place them in a large stainless steel or other non-reactive pot or saucepan. Add enough water to be able to see, but no so much that the crabapples are floating. Bring to a boil, reduce heat to medium, and let simmer for 10 to 15 minutes. The apples should soften and change color.
2.Strain the apples and juice through 2 or 3 layers of cheese cloth. Do not squeeze. Use just the clear juice. You should have at least 4 cups of juice. Discard pulp, and pour the juice back into the rinsed pan. Bring to a simmer, and let cook for 10 minutes. Skim off any foam that comes to the top. Next, stir in the sugar until completely dissolved. Continue cooking at a low boil until the temperature reaches 220 to 222 degrees F (108 to 110 C). Remove from heat.
3.Pour the jelly into sterile jars leaving 1/4 inch headspace. Process in a hot water bath to seal.
**NOTE: I will post the crabapple wine recipe when I make it.

 Since I have begun using medicinal herbs, I have learned to make salve. It is so handy! I grow a lot of herbs that are antiseptic, antifungal, antibiotic. Some are great healers, good for burns, good for bites and many other topical uses. The salve makes using them so easy! I can trake a small container of purslane salve for insect bites with me camping or doing anything outdoors. That stuff is amazing! Just a little and you can just forget about the bite from that point forward. It works much better than baking soda.
I only use olive oil and beeswax as a base. Its all organic. The olive oil keeps much longer than other oils without going rancid. I also add vitamin E to heal and as a preservative. I don't add scent but could with essential oil, if I wanted to, but then I would have to take the properties of the essential oil into account, as well. Today I made a healing salve for my friend, Janet, at her request. It's for her family member's acne and exzema. It contains a large variety of healing, antibacterial, antiseptic, antifungal herbs. Normally, I would not put this much material in a salve, as sometimes herbs are more specific in their uses, but since this will be used by several family members for a variety of problems, I used a variety of herbs. I call this "Janet's Salve".
 I plan to make more salve for insect bites and some for burns/sunburn. I usually like to put salve in those little thin metal tins, but these work perfect for gifts. Janet gave me these jars, anyway, (They are good for so many things!) so it's only fitting that I use them. I am out of the metal tins anyway. All herbal products should be stored away from the light or put into dark containers.
I just love using medicinal herbs and they work so well! I have been amazed several times at how effective some can be!
I plan to make more salve for insect bites and some for burns/sunburn. I usually like to put salve in those little thin metal tins, but these work perfect for gifts. Janet gave me these jars, anyway, (They are good for so many things!) so it's only fitting that I use them. I am out of the metal tins anyway. All herbal products should be stored away from the light or put into dark containers.
I just love using medicinal herbs and they work so well! I have been amazed several times at how effective some can be! 

Goldenrod is one of those wild flowers that people take for granted and consider a weed. So did I, until this year. I have begun to do a lot of research into medicinal herbs, focusing on what I have growing here. We have been blessed with so much growing here in the way of medicinal herbs, right at our fingertips! Goldenrod is one of them!
Goldenrod (Solidago) flower tea is used to treat most urinary tract problems, as well as inflammation of the intestines and kidney problems, especially kidney stones.
It is antiseptic, anti-inflammatory and antifungal making it useful for healing all kinds of sores and wounds externally.

The chemicals in goldenrod are specifically effective against infection from the Candida fungus, which causes all kinds of yeast infections and oral thrush in the human body. Goldenrod tea is also effective in the treatment of chronic sore throats, in alleviating chronic congestion in the nasal passages as well as in treating problems such as diarrhea and other digestive disorders.
Goldenrod tea can also be used as a mouthwash or as a douche for the treatment of yeast infections in the vaginal cavity.
Another "weed" that turns out to be a great herb. I have some drying now for tea and plan to cut and dry a lot more before winter comes. I am putting it in my immune boosting winter tea.

I made herbal ear drops for the first time today, for hubby. These drops are made with dried herbs infused in olive oil. Many people say that this recipe works very well for earaches, infections, swimmer's ear and so forth.
I believe it! One of the ingredients is calendula oil. Calendula is an antibiotic, antiseptic, antifungal, so is the garlic. The other ingredients are also antiseptic healing agents.
This is the recipe:
Herbal Ear Drops
Using herb infused olive oil:
30ml calendula oil
25ml mullein flower oil
25ml St. John's Wort flower oil
20ml garlic oil
After infusing each herb in olive oil, I used a small shot glass with the measurements on it to measure out the amount in militres. As with anything else like this, make sure everything is sterile and rinsed well before using it.
The bottle is a travel size taquila bottle. I beg these glass bottles from anyone I know who travels. I have even been known to take bottles out of the recycling as I walk by. They are the handiest little bottles!
Update, next day:
I had planned to make this ear oil and so have been collecting the flowers and herbs to do so for awhile now, since I have had a recurring mild earache for months. It comes and goes, usually about the time I say I'm going to the doctor, it goes away.
Hubby's earache had been getting worse for a few days when he told me about it. I asked him why he didn't say anything sooner. He said it was because I had been mentioning that I was going to make some herbal ear drops and he was just waiting for that and how much longer was it going to take me? I felt a little guilty but, hey, he never said anything. How was I suppose to know this? So I made them right away, yesterday, when I posted this recipe.
I also recommended that he take a decongestant to help dry it up inside, which he did, as well. I put several drops in his ear, he left his head to the side and moved his ear around so at least some of it could get down inside his ear canal.
This morning he woke up and the earache was gone! Completely better! I have tried a few times today to get him to continue the drops for another day or two, just to completely clear up the infection. He won't go for it, says he doesn't like oil in his ear. (Men can be awfully stubborn sometimes...)
I grow all of these herbs and have seed for them all, as well, except for the calendula. I didn't get much seed this year from those. I only had two little plants come up. Next year I will have a large double row of them in the herb garden. It's an important herb. It's antifungal, in addition to everything else it does.
Not only is this oil good for earaches, It will help heal just about sore you may have. (Don't get it in your eyes. You will be sorry, if you do!)
We have become great believers in herbal remedies this year. The purslane for mosquito and fly bites is truly stunning in how well it works!!
Likewise for the feverfew for migraines and the sleepytime tea mix I make up for hubby.

I grew onions this year! Lots of big beautiful onions for the first time! It is not, however, the first time I have planted onions, just the first time they actually grew into onions. Those are my onions in the picture above! Next year I am planting a lot more. I didn't grow enough to last us a year because I wasn't sure they would grow well this time and I didn't want to waste the space.
Since I had the onions and the cold cellar with hooks in the ceiling, I learned to braid them. I love the look of hanging onions and garlic. I'd like to hang them in the kitchen, but they wouldn't keep long in that warmth. After they are cured and dried well, they have to be kept cold. The cellar might work. This year will be the test.
It took me awhile to get the hang of braiding onions. It's not something one can just sit down and do. I read a lot of sights online that had pictures and instructions, but I still couldn't get it to work. Then one day it just hit me, I had an Aha! moment. They are braided from the bottom up, not the top down! From that point on I had it. No one told me that! All those sights I looked at never said to start at the bottom of the braid and go up!
 After that it went fast. I'm used to putting a French braid in my hair and this works the same way, going in the opposite direction. It has to be quite a bit tighter, however, to hold. I had to repeat it a few times to get it tight enough to hold the onions in place. If I braided my hair that tight, I'd have a headache in no time! This one on the left is too loose and came apart.
The top pic is a final tight braid but could be even tighter. I think that part takes some practice. I have to leave the tops longer next year too. I trimmed them back a bit and I shouldn't have.
I have learned a new skill! I will have to go back and read this post before starting next year. I will have forgotten the key elements by that time, I'm sure. Next year I will do better and have a lot more onions to braid, as well!


 It is very easy to overwinter in the right conditions. If you already grow cannas, callas, dahlias, caladiums or other tender bulbs, you can overwinter four o'clock roots. I treated it exactly the same and it came back this year. I grew new ones this year, as well, a yellow and a white. I will be keeping those over the winter this year too.
 Mine are solid colours but they come in "broken" colours too. I would LOVE some of those! If you have seeds from broken coloured 4 o'clocks and want to trade seeds, let me know. They need to be all broken colours and not open pollinated with solids near by. It's been my experience that the solid colours are dominate. I have tried it before.
 Do you grow four o'clocks? Do you keep them over the winter? As practical as I am, I still love my flowers!