We use a lot of jams an jellies at my house. My guys eat it on toast and pb&j sandwiches. Its good as a topping for ice cream or a glaze for cooking meats, too. The flower jellies make great gifts. A basket of homemade and unusual things from the kitchen goes over very well at Christmas!

This is bee balm (Monarda Didma) jelly, red, of course. You can make jelly from the native purple too (Monarda Fistulosa) but the colour will not be red. The colour in the jars is natural. There is no food colour added. I am hoping to make a lovely pink wine from the gallon bucket of bee balm petals I have saved in the freezer.
I have a lot of the red in the garden and I like the colour, so I am using that for the jelly. I do have some of the native purple, as well, but probably won't make jam from it this year.

I have collected a gallon of bee balm petals for wine making. I will use a little of that in addition to what I picked fresh this morning. I think the ones I picked today will be the last of the bee balm petals that grow this year. Some areas don't have any stalks or leaves anymore, either. Thanks to our dog, Buck who is a great help in the flowerbed!
 You can make jelly from almost any edible flowers. You can see my list of edible flowers on a previous post "Making Flower Wines". Some of these will make good jelly and some will not. Please taste it in a tea first to see if you like it. We like bee balm. Hibiscus is another one that makes good tea, jelly and wine. Mine are in bud now! Rose petals also make good jelly if you use scissors to cut the petals off, leaving the white bottom part behind. Its slightly bitter. I have a gallon of wild daylily petals in the freezer for wine. I could use a few of those to make jelly too. I don't know if we like it or not. I think I'll have some wild daylily tea today and see. I have some dark red daylilies blooming now in the garden I could use for jelly. That would have a beautiful colour! So many possibilities! Experimenting is fun!
 Mint and other herb jellies are made the same way as the flower jelly. These jellies are used mostly as glazes for meat at my house. No one eats sage jelly on toast! I like the mint, myself, on ice cream and so forth but I am the only one that eats it like that. Hubby is not too fond of mint. Apple mint jelly might be good. I wonder if hubby would know it has mint in it. I would tell him, after he ate it and said it was delicious!
Recipe for flower and herb jellies:
Mint and other herb jellies are made the same way as the flower jelly. These jellies are used mostly as glazes for meat at my house. No one eats sage jelly on toast! I like the mint, myself, on ice cream and so forth but I am the only one that eats it like that. Hubby is not too fond of mint. Apple mint jelly might be good. I wonder if hubby would know it has mint in it. I would tell him, after he ate it and said it was delicious!
Recipe for flower and herb jellies:
2 cups flower petals (or fresh young herb leaves)
2 1/4 cups water
1/4 cup lemon juice
600 grams liquid pectin (2 pckges) or equivalent powder
(You may find that the liquid works better for this purpose than the powder)
4 cups sugar
So this is the basic recipe: same amount of water and flower/leaf material. Some lemon juice. Twice that total in sugar. One package of liquid pectin per approx 1 cup of water used, before adding the flower petals and sugar. You can make jelly from whatever amount you have. In a small saucepan, glass or stainless, bring the flower petals or herb leaves in the water to a boil. Cover and set aside. Let this sit overnight or for a several hours. Strain, squeezing out the all the water into the saucepan. Put the pulp into the compost. This water is called an "infusion". Bring the water to a boil and stir in the sugar until well dissolved.
 Stir in the pectin and boil hard for two minutes. Pour into hot, sterilized jelly jars. You can sterilize the jars, seals and lids by boiling them or running through the dishwasher with detergent by themselves on HOT. Put on seals and rings. Set the lidded jars into a large, tall pot. Put enough water in the pot to cover the jars with an inch of water above the top. Boil for 10 minutes (start counting when the water is boiling). Remove jars from boiling water, let cool and remove rings. Store at room temperature. Refrigerate
after opening.
Stir in the pectin and boil hard for two minutes. Pour into hot, sterilized jelly jars. You can sterilize the jars, seals and lids by boiling them or running through the dishwasher with detergent by themselves on HOT. Put on seals and rings. Set the lidded jars into a large, tall pot. Put enough water in the pot to cover the jars with an inch of water above the top. Boil for 10 minutes (start counting when the water is boiling). Remove jars from boiling water, let cool and remove rings. Store at room temperature. Refrigerate
after opening.
 I use a water bath canner for this but its not necessary if you have a pot tall enough. If you use the short, little jam jars you might have a pot that tall. I use a smaller pot if processing just a few little jars.
Yum! Bee balm jelly is delicious! The scent is quite strong when I open the jar! I love the smell of bee balm! I often pick a leaf in the garden just to smell it.
Using all the richness God has surrounded us with gives me such a feeling of accomplishment! I love to line up all the jellies I have just made, while they are cooling, and just look at them. A full larder is such a beautiful site! We are so blessed to live here and have all of this God given splendour!
 We love ground cherries! They are an old, old fruit that is making a comeback. I have even seen them in a grocery store recently! Up until a few short years ago, I had never seen one. Now I have a garden full of them, growing.
They are a small golden fruit in a husk, just like my picture above. The fruit is juicy and sweet, tasting sort of like a pineapple tomato cross. Its very good!
I have old recipes for ground cherry pie and ground cherry jam. I am going to make both this year and ground cherry wine (of course). I might also can some for winter pie filling. We are trying to save freezer space for the corn.

Last year I only grew a few, about six plants, and we got enough fruit to make a pie or two. This year I have A LOT of ground cherries growing. These are my ground cherries. The big ones are now shoulder hight!

I had planted them previously in a dry and not too healthy section of the flowerbed and they only reached about 2 ft in height. This year they are in the well manured lasagna garden. What a difference! They are covered in fruit too!
The fruit looks a lot like a little tomatillo when it is growing and they are related. I grow the Aunt Molly's ground cherry variety. Its the sweetest and the most common.
I don't usually use a recipe to make pies but I have listed the ingredients that I intend to use for the ground cherry pie, below. See previous post, "Making Pies Without A Recipe". This will be the first year that I have made pies and jam with them but I think they will be delicious!
4 cups husked and washed ground cherries
1 cup sugar (they are sweet by themselves)
6 tablespoons flour to start
Directions: Cook in pot until thick. Sweeten to taste and continue to thicken if needed. Pour into unbaked pie shell, cover with top crust and bake at 350F until pastry is golden brown.
I'm not quite sure of the recipe for jam. I am going to find something close on the Certo recipe paper that comes in the box and just use that.
The ground cherries are not ready yet. When they are I will be very busy!! I hope the ground cherries and chichiquelites (garden huckleberries) are not both ready at the same time!!

 Do you like mint? I love it! Its one of my favourite flavours! I like mint tea, mint coffee, mint cookies, mint candies, mint ice cream...I love mint! I think this is a good thing, since mint spreads so rapidly that it soon becomes invasive. We have it growing everywhere!
It grows wild in the fields here. It is too invasive for an herb bed. It also likes growing in the water and can take over a pond, but I don't consider it a weed. I like the smell that fills the air when I brush up against it. I would plant it if I didn't already have so much growing wild. There's a massive patch growing behind the chicken house in full sun. It does really well there with the chicken manure residue that finds it way through the soil. I have a patch 4 ft wide and 3 ft tall growing out in the field, too. This year I am going to make mint wine. I think mint wine would be fabulous! A light bodied, soft mint flavour would be a good compliment to the wine taste, or made into a spritzer, cold on a hot
summer day.
This year I am going to make mint wine. I think mint wine would be fabulous! A light bodied, soft mint flavour would be a good compliment to the wine taste, or made into a spritzer, cold on a hot
summer day.
 This is what I picked today behind the chicken house. I haven't gotten to the stuff growing in the field yet. This will probably provide me with enough mint to make a gallon of wine, maybe. I am putting it in the freezer for now, so can always add to it later if
I need to.
This is what I picked today behind the chicken house. I haven't gotten to the stuff growing in the field yet. This will probably provide me with enough mint to make a gallon of wine, maybe. I am putting it in the freezer for now, so can always add to it later if
I need to.
A lot of these leaves are too old. I only use the fresh, juicy, fairly new leaves and buds for consumption. After I pick those off, the older branches will hang under the porch to dry. I will use these dried older leaves for a scented, herbal bath mix, a potpourri mix, or on a scented herb grapevine wreath for outdoors in the fall.
I set up a spot to work outdoors in the shade with a table so I can stand up straight and save my back. I want to fill a four litre ice cream bucket with leaves for making wine. The hose is on so that everything gets rinsed as its processed and I have a bottle of water for me. Its 90F outside today! 
You can also see Buck's nose in the bottom right corner. He's helping (sort of...). He's always nearby when I'm outside, if not right in my face! He's really quite good company most of the time, for a 6 month old HUGE puppy. It's hard to put anything out of his reach. When he stands up he's almost as tall as I am now. LOL! He likes to lay on the sofa but if he moves around much he falls off. He's taller than the seat on all fours and can just slide off onto his feet. He is such a sweet and gentle boy, thank goodness!
This is what I managed to salvage from that bunch of mint cut earlier and a second bunch that size from the field. There's lots more out there but this is all I am collecting today. 
 Next week, if I have time, I will collect more to make some mint tea. I did make a cup today. Mmmmmmm, delicious and so soothing!
I am also going to make some mint jelly this year. This is my recipe for mint jelly. Its very simple.
MINT JELLY
1 1/2 c. fresh mint leaves, packed
3 1/4 c. water
Green food coloring
1 box powdered pectin
4 c. sugar
Wash fresh mint leaves carefully and crush in water. Heat to a boil; cover and allow to steep for at least 10-15 mintues. Strain through double cheesecloth; measure 3 cups mint infusion (the boiled mint water). Add a few drops green food coloring to tint. Add pectin; bring to a boil. Add sugar; bring to a hard rolling boil. Boil for 1 minute, stirring constantly. Remove from heat; skim off foam with metal spoon. Pour at once into hot sterilized jars, leaving 1/4 inch head space and seal.
Boil jars for 10 mins in water bath. Makes about six 1/2 pints.  I LOVE mint ice cream. This is a picture of the commerical mint choc chip ice cream that I have now but you can make your own.
EASY MINT ICE CREAM
For one pint, wash and dry one cup of leaves -- we prefer peppermint -- and discard stems. Using the back of a wooden spoon, crush leaves together with 1/2 cup sugar until the sugar resembles wet sand. Stir in one cup each of milk and heavy cream until sugar dissolves; refrigerate for 2 hours. Strain the mixture, discard solids, and freeze in an ice-cream maker according to manufacturer's instructions.
After I have cut back the current growing mint stalks, the mint will continue to grow and put out more new growth for me to harvest again in about a month. This will either be dried for cooking or go into the freezer.
Mint growing under a bee hive is suppose to help keep predator insects away.
Don't consider your wild mint a weed! Harvest and use it all. Its great stuff!


We have had a lot of sun and rain this year so our gardens are growing well! The picture above is a zucchini plant, producing like crazy! We are getting a lot of zucchini right now.  These will go into the basement for storge, destined for the Salvation Army soup kitchen.
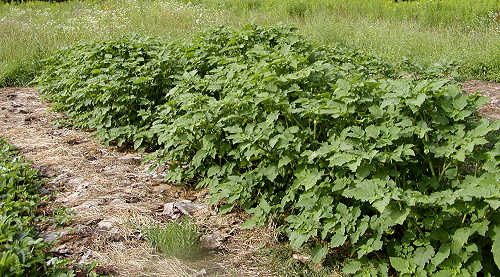
 This is part of our squash bed with a couple of sunflower rows growing behind it. On the other side of the sunflower rows are more squash, sweet baby watermelon and cantaloupe. There are 12 hills of ambercup and 12 hills of turban buttercup pictured here, with 3-4 plants per hill. Also there is one spaghetti squash plant and one 'upper ground sweet potato' squash plant and three giant pink banana squash plants.
I also have two 'sweet mama' squash planted on a trellis with the tomatoes and two acorn squash planted on the fence by the driveway.
On the other side of the sunflower rows are Hopi pale gray and Hopi black squash growing. I planted these mainly for the seed. These Hopi squash have almost dissappeared. They were the original "Three Sisters" squash planted by the Hopi indians. I intend to sell the heirloom seeds next spring. I am also curious about the keeping ability of the gray. I have read that it is one of the best keepers out there.
I like growing squash! I'm obsessed with squash! I could grow nothing but squash and be happy! All in all, we will have a LOT of squash this year. Lots of people to feed!
Right now I am hand pollinating the squash. Since bees are the only insect that pollinates squash and they are dissappearing, we were getting a lot of blooms and very little fruit. I started pollinating them myself last year and we had a bumper crop! It makes a difference! You can read about hand pollinating squash in a previous post entitled "Growing
Squash and Recipes".
 This is our corn
 and our beans.
 We also have pole beans planted on one corn row, as an experiment. The pole beans climb the corn stalks and are suppose to help keep it upright in a storm. They add nitrogen to the soil as they grow, giving more to the corn which is a high nitrogen feeder. This is our first year to grow beans on the corn. It seems to be going well.
 Our tomatoes are ripening and we have a lot of them! We planted a doz each of extra large Portugal tomatoes and 'San Marzano' plus a few Manitoba tomatoes and 'Keeper' tomatoes. The 'Keeper' tomatoes are an old heirloom reputed to keep well into Feb before ripening, if kept cool and dark, as in a basement. This is our first year for those. We'll see how it goes. There are a few grape and cherry tomatoes too and some that I am growing as a test for a group.
 You can read more about our favourite tomatoes in
"Our Tomatoes".
You can read more about our favourite tomatoes in
"Our Tomatoes".
 The sweet potatoes are growing and look healthy. Whether or not they will have time in our short season to produce much, remains to be seen. I started my own sweet potato slips (cuttings) for planting out this year, see "My Sweet Potato Slips".
 We have peppers! I started the bells extra early this year and babied them. I had two trays of my own healthy babies to plant out in May this year. This will be the first year I have successfully grown bell peppers! I am so pleased!
 These are our tomatillos. This will be our first year to grow these, as well. We plan to make some salsa with them and the cilantro I have growing in the herb bed. They grow in a husk, like ground cherries and are related to them.
 The green onions and lettuce are doing well. A case of salad greens and onions went to the Salvaton Army soup kitchen just a week or so ago. Too bad lettuce doesn't freeze or can! It sure produces a lot!
We also have a double row of cucumbers climbing on a trellis, a row of beets, a row of Spanish onions, two rows of cabbage and three rows of broccoli, not pictured here. All except the cucumbers are buried in grass so I saved you the horror of looking at that :-)
All in all our garden is doing very well, except for the excess grass. The veggies are still growing in the grass, they're just not pretty to look at.
These are our ground cherries and garden huckleberries (chichiquelites). Good fruit for pies, jams and wine making.
The Lord has blessed us with a lot of good food to share with those in need!

Our raspberries are ready! We love the tart, fruity flavour of fresh raspberries! A few raspberries added to things can raise the flavour to a whole new level.
 We have three large red raspberry bushes, producing for the first time this year. We have purchased our fresh raspberries in the past. These bushes have produced enough berries to make one pie and one small cobbler, so far.

This is my recipe for raspberry pie filling. This makes two pies:
9 cups washed berries
3 cups sugar
1 cup flour
Cook on top of stove until thickened. Pour into prepared crust and bake at 350F for 45 mins.
You can find my pastry recipe on a previous post entitled, "Farm Baking".
I also made a raspberry cobbler with the filling I had left. I just cooked a pot of filling from the amount of raspberries that I had saved. I picked them every day as they ripened and just kept adding them to the bucket in the freezer until it was full. I cooked them in a pot, sweetened to taste and thickened with flour dissolved in a little cold water until it was sweet and thick enough for pie. I filled the pastry and had enough left for the cobbler too. If I don't have enough of a fruit for a pie, I make a cobbler. A cobbler is a baked fruit thing without a bottom. (A flan is a baked fruit thing without a top.)
I have been using this cobbler recipe since I was in high school. Its the best one I have ever used and it is so simple and easy!
It is very thick and is just spooned on top like biscuit dough.This is my cobbler recipe. I make it in a loaf pan.
4 cups sweetened berries or enough to fill a loaf pan about 1/3 full.
1 cup flour
1/2 teaspoon salt
1/4 cup soft butter
1/2 cup sugar
1 1/2 teaspoon baking powder
1/2 cup milk
Combine dry ingredients with butter in a mixing bowl then add the milk and mix with mixer until well blended. Spoon on top of fruit in loaf pan. Bake at 375F for 45 minutes.

You can also make raspberry wine and raspberry cordial or liqueur. I collected enough berries, with the addition of some wild black ones, to make some raspberry liqueur. I just put the washed berries in a lidded jar and covered them with tasteless alcohol (vodka works for this) and added a little sugar. Its sweetened to taste. You might want to put a lot in. They will sit in there for about six weeks while I am going to shake it daily or whenever I think of it. When the six weeks are up, it will be strained and bottled and left to age. It can be imbibed immediately, but gets mellower with age. After a year it will be fabulous! I don't think it will be here
in a year.
Raspberry jelly is also a favourite at our place. I run the berries through the juicer first, then make jelly with the juice, sugar and certo. I didn't have enough berries this year. I still have a few dozen jars of strawberry and peach freezer jam from two summers ago, sitting in the freezer. We don't eat very much jam.
 Any leftover rapsberries get frozen in ice cube trays. I freeze everything in ice cube trays. I have bags and bags of frozen cubes of all kinds in the freezer.
Frozen cubes of rapsberries make great blender drinks on a hot day!

 We love rhubarb, especially rhubarb pie!

My rhubarb grows in thelasagna garden with my salad things, herbs and berry collection. Most of that garden is perennial so it makes sense to grow it there, since it is perennial. I like to till up the vegetable gardens in the fall
and spring.
I am adding to my rhubarb this year, since we have discovered rhubarb pies. I originally planted it for wine making, which I still plan to do. I will only make one gallon this year, just to see if we like it and because I don't have a lot of rhubarb right now.
The rest will go into the freezer or be canned for winter pie filling storage. I like to make the pie fillings ahead of time and freeze them. I also make pastry ahead and freeze it, so pie making is simple and quick.
Rhubarb should be picked when the entire stalk is red. The green parts are not that good to eat since they are not ripe yet. If you pick it when it is green at the top and add that to the rhubarb you use, it will be extremely tart. The secret to good rhubarb is to use it only when it is ripe enough. Your rhubarb is going to be very tart, that's its nature. You will just need to add more sugar to it.
The bottom of the stalk should be a dark wine colour.
The peel of the rhubarb cooks to a very tender state. When the rhubarb is cooked you won't be able to tell the peel from the rest of it, so it doesn't need to be peeled first. Its not like celery, where the peel stays tough and stringy. You will waste a lot of good fruit if you peel it first. Do cut any brown or black spots off, however. These have a bit of green at the top that will need to be cut off.
Chop it up into little pieces before you cook it and it will be more tender and cook faster.
These have a bit of green at the top that will need to be cut off.
Chop it up into little pieces before you cook it and it will be more tender and cook faster.
This is my pie filling recipe for Rhubarb pie:
4 cups chopped rhubarb
3 cups sugar
1/2 cup flour
Combine well in pot and simmer on low, stirring well. Cook on low until slightly thick and bubbly, stirring more or less continually. Pour into prepared pie crust, put the top on and bake immediately at 350F for 45-50 minutes, until the crust is well done, top and bottom. You don't need to cook the filling while baking the pie, since you did most of that before you put the pie in the oven.
If you are adding the hot filling to a pie crust, you have to bake it right away. The hot filling will melt the fat in the crust and it won't be the same if you wait.
If you are not baking it right away, store the filling separately in another container until you are ready to bake the pie.
To freeze the filling: let it cool completely then spoon into a freezer bag. Get out all the air and flatten it. Flat bags stack in the freezer and take up less space.
Just an important note: Rhubarb leaves are very poisonous. You can make insecticide out of them that will kill anything.
 A few weeks ago I tested vinegar as a weedkiller in my "Dealing With Weeds" post.
This is what the weeds looked like before I sprayed them.
I sprayed all the weeds in my walk and drive with vinegar and waited. The next day many looked dead and the grass was turning brown, so it did affect them. It did not, however, kill them. It rained about two days later and a lot of the grass and weeds came back.
 This is what they looked like a week later. Smaller but still there, green and growing.
Maybe I didn't saturate them enough? I don't know. I think my mother in law told me that she pours it on the plants that grow on her driveway to kill them. Maybe the vinegar should be poured on the plant rather than sprayed lightly on the leaves? I will talk with her further.
I have not yet used it on the big weeds. I may try that this weekend.


 You can make jelly from almost any edible flowers. You can see my list of edible flowers on a previous post "Making Flower Wines". Some of these will make good jelly and some will not. Please taste it in a tea first to see if you like it. We like bee balm. Hibiscus is another one that makes good tea, jelly and wine. Mine are in bud now! Rose petals also make good jelly if you use scissors to cut the petals off, leaving the white bottom part behind. Its slightly bitter. I have a gallon of wild daylily petals in the freezer for wine. I could use a few of those to make jelly too. I don't know if we like it or not. I think I'll have some wild daylily tea today and see. I have some dark red daylilies blooming now in the garden I could use for jelly. That would have a beautiful colour! So many possibilities! Experimenting is fun!
 In a small saucepan, glass or stainless, bring the flower petals or herb leaves in the water to a boil. Cover and set aside. Let this sit overnight or for a several hours. Strain, squeezing out the all the water into the saucepan. Put the pulp into the compost. This water is called an "infusion". Bring the water to a boil and stir in the sugar until well dissolved.
 Stir in the pectin and boil hard for two minutes. Pour into hot, sterilized jelly jars. You can sterilize the jars, seals and lids by boiling them or running through the dishwasher with detergent by themselves on HOT. Put on seals and rings. Set the lidded jars into a large, tall pot. Put enough water in the pot to cover the jars with an inch of water above the top. Boil for 10 minutes (start counting when the water is boiling). Remove jars from boiling water, let cool and remove rings. Store at room temperature. Refrigerate
  I use a water bath canner for this but its not necessary if you have a pot tall enough. If you use the short, little jam jars you might have a pot that tall. I use a smaller pot if processing just a few little jars.