Tuesday, October 27, 2009

Buildling a Cold Frame


Those of you who live in the north, as I do, know the frustration of working with a short growing season. There are so many new and interesting things to grow out there and I would like to grow them all, at least once. Our short growing season, sometimes makes that difficult. I plant seeds early indoors on the windowsill but that is not always enough and there is not a lot of room on my windowsill. I could set up artificial lighting indoors but the cost in electricity would sometimes offset the benefits of growing my own food. A good way to overcome the short season is with a cold frame.


A cold frame is a small greenhouse built into the ground. This takes advantage of the insulating properties of the earth itself. The only glass you need is the top. I built mine using a glass patio door, but it can also be done with smaller windows. Double paned is better insulation against the winter cold but single paned will also work, especially if you are only using it spring and autumn and do not intend to overwinter plants inside a heated cold frame. Some gardeners put heating cables inside the cold frame in order to grow greens in there all winter. Other gardeners heat it with a manure and hay mix, taking advantage of the chemical reaction that causes heat. I only use mine for starting seedlings early in the spring and hardening off what I have started.


You can build a cold frame that will work well by just digging a hole in the ground. The hole needs to be just a bit smaller than the glass top to get a fair seal all the way around the lid as it sits on the ground. The lid can just be flat over the hole in the ground. This is a simple and yet workable cold frame. Put your vegetable and flower seedlings in the hole in the spring and cover with the glass top to let the sun in. This will protect the seedlings from the frost during the cold spring nights.Before I had a cold frame I had many, many seedlings in trays that I brought into the house each and every night. I then brought them back out into the sun the next morning, in and out, in and out - it gets quite tedius. The cold frame made the entire hardening off process much easier. I just put all my seedlings into the cold frame as soon as it was barely warm enough and closed the lid. I did have to wash the lid first for the sun to get through. It was covered with little muddy racoon prints, among other things.

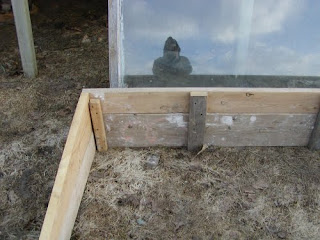
I lined my hole in the ground with 2" wood. I also cut the wood so the back would be 6" higher than the front. This allows the sun to reach more of the seedlings and gives me a bit more height to play with. I put shelves in the cold frame to raise the baby seedlings up to the window. I lowered these as the plants grew taller. It is important to keep the leaves of your seedlings away from the glass or they will rot on the glass and block the light. 


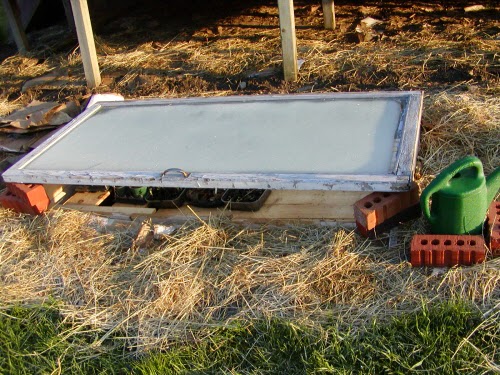
As spring goes on and the weather warms up, you may need to open the lid a bit during the hottest part of the spring day. The sun shining directly into the cold frame can raise the heat to a temperature that may cook your tender seedlings under the glass. This also helps to harden them off as they grow thicker stems to adjust to the breeze.


Glass patio doors are not hard to pick up for very little cost. I got mine free at the side of the road. I also managed to pick up four more new and single paned glass patio doors this past summer. All for for free!! People are always rebuilding their homes and replacing old windows and doors. Keep your eyes open as you drive around and let all of your friends know what you are looking for.

I have visions of a long line of cold frames along the edge of the garden. I have the doors and wood to build them, I just don't have the time! It is an age old problem and a really nice dream!

Saturday, October 24, 2009

Growing tropical brugmansias


I have a fascination with brugmansias ("brugs" to those gardeners who grow them.) They have the most beautiful and spell-binding flowers. They are also very easy to grow indoors or outdoors in the summer.


I got mine as cuttings in the mail. I traded someone for them in Sept of last year. Cuttings root very easily in water but only if the water is warm. If you let the water get cold, they will not root. It is important to keep the cuttings in a place that stays fairly warm most of the time. Unfortunately, in mid winter or late fall, that can be difficult for some people. You can always use a heating pad on low, with a few towels folded on it for warmth under the water. After a few short days in warm water the cuttings will develop pre-root thingies (its an industry term) on the part in the water. They should look like this:


After these have developed you can safely plant your cutting in slightly damp potting soil. Keep the cutting fairly warm and only slightly damp. Too much water will cause it to rot and too dry will kill it. Brugs do not like to dry out at all, so just keep it constantly slightly moist. I have not had a problem with mine. When they look a little wilted, I water them. I usually end up watering them about the same as my other houseplants, after they have started growing.


I keep mine in the kitchen by the south patio door. I empty the day old coffee into their various pots every morning and dump the coffee grounds into their pots. They seem to like it.


After a couple of weeks you should have some leaves sprouting. Put the cutting in a sunny area throughout the winter. It doesn't have to be a south window, just an area that gets some sun. The goal is to keep it alive until you can put it outside in the spring, after all danger of frost has passed.


After they have started actively growing, feed them weekly with a very mild fertilizer solution.


I kept the growing new plants in the kitchen all winter long. By the time spring came along they were this size. Your brugmansia will triple in size outdoors in the summertime.


When all danger of frost has completely passed, they can go outside. Up here in the north, they do best in full sun. Down in the southern states in the extreme heat, they do best in a fairly shady area. Half shade is ideal.


When they are actively growing they need a lot of fertilizer. They are heavy feeders. I almost think it is impossible to overfeed them. I use time release fertilizer in the spring and apply it liberally into the soil and the planting hole where my brugs are going.


They will grow at an alarming rate with good light, lots of fertilizer and enough water. They don't like to dry out completely and will wilt readily if they need water, and they need a lot of it. If given the right conditions, you will be rewarded with the most fantastic blooms you have ever seen. I started my cuttings in September 2008. I got my first bloom in October 2009. This is it.

If you live in the great white north, as I do, you will need to do one of two things with your brugmansias in the fall. You can either dig them up, plant into very large pots and bring indoors to be grown as houseplants; or you can dig up the root ball, put it into a pot or plastic bag, water and keep in the cold cellar, cold, unfrozen and dormant until the following spring.


When spring arrives and all danger of frost is past, it can be planted back outdoors again. You will need to harden it off and put it outside gradually.


If you start your cuttings now, perhaps you can get blooms by next fall too. If mine continue to grow indoors. I will have some cuttings to trade soon. If you are interested in a cutting from the pink one pictured above, please send me an email.

This is what I am hoping for from my mature brugmansias next summer. These photos are not mine. These magnificent plants belong to someone else, but there is hope for mine next year!


Monday, October 19, 2009

Rose Petal Beads

Rose petal beads can be made from any rose petals, but the red shades will have a better colour when they are finished, sort of a deep mahogany. Cooking them in a cast iron pot will also deepen the colour. You don't need a very large amount of petals to make beads. They don't seem to lose much material in the cooking.


Start with collected rose petals. Some say to cut off the white bottom, but I do not have the time or ambition to do that and they come out just fine. Crush the petals or grind them up with a mortor and pestle and put them in a pot with a little water to cover. Heat very gently, without boiling, until the petals are a mush. This takes several hours. Keep the heat very low so that they never boil, just stay very hot. Add a little water if needed, to keep them moist. Do not let the water evaporate.

After 5-6 hours the petals should be ready. Press them into a fine sieve, getting out as much water as you can. If needed you can then wrap them in a towel and squeeze out even more water. Form the remaining paste into balls. They will shrink by 50%, so make them twice as big as you want the beads to be. Squeeze them into tight balls. Put a piece of wire or a coat hanger through the middle to make the hole for the string. Form the bead around the wire. You can shape them on the wire making them oblong or square, or you can make them round. You can make several different shapes and sizes. Make tiny little ones to put on earrings.

Before you are shaping them and they are fairly cool, you can add a drop or two of rose fragrance oil if you want them to have a stronger rose scent. Only a drop is needed as it goes a long way.


As they dry you will need to move them a little on the wire or they will be stuck to it and you will not be able to get the wire out of the bead when it is dry.

After you have the beads strung on the wire, hang them in a warm place to dry. They should be dry to the touch overnight and will continue to dry and shink for another week or two. After about two weeks, they are ready to make into jewelry. You can put a gloss varnish on them or leave them natural. I think they look best strung with other beads that will bring out the mahagany hues.

I don't have any completed beads to show you, unfortunately. I no longer have the ones I made years ago and, well, I burned the ones I was making yesterday in the pictures above. Its very easy to burn them. They smelled like roses, for awhile anyway until they began to smell burned. Its mid October and I don't think I am going to get any more rose petals this year. If I do , I will heat them on the wood stove instead of a burner.

I often do not know exactly how I am going to design a piece of jewelry until I have everything in front of me, including all of the beads I have to use in those colours. Sometimes I will re-do a strand many times before I am happy with it but that is the nature of designing. I like to look at other jewelry designs on the internet to get ideas for new and unusual things to do with the beads. Most jewelry designers are just stinging the beads together and focusing more on their usual beads. It is rare to find a different way of putting the beads together.

Jewelry making is fun! Once you get started it is hard to stop. Handmade jewelry made with your own rose petal beads will make a great Christmas present too!

Friday, October 16, 2009

Making Herbal Infused Oils


I use my herbal infused oils for soap making more than anything else. We do use them some in cooking but tend to prefer the fresh herbs for that purpose. A week prior to your planned soap making day, you can make your own herb infused oil.


Right now I want to make oil infused with oregano and thyme for their antibiotic and antiseptic properties. Many people have raved about this herbal soap and how it has cured their acne and other skin problems. I think it is the natural antibiotic properties of the thyme and oregano.


First a trip to the herb garden. Needless to say, if you plan to make soap in the middle of winter and want to use herbal oil you had best make the oil now and freeze it for winter use. You can also grow your own herbs in a pot on the windowsill through the winter.

I am clipping some oregano and some thyme, a mason jar full.


I will rinse the leaves then crush them in the jar. You could probably speed this process by blending them in a food processor before putting them in a jar. Mine are crushed then covered with oil. Because my house is cold at night and this has made the oil cold, I will warm the jar, without the lid, in the microwave for about 30 seconds, just until the oil is slightly warm. The lid is put on and I will shake the jar several times a day whenever I pass by for about a week or until I am ready to make soap.


I let the herbal oils intended for soap use sit out at room temperature. If I were going to take them internally or use in cooking, I would keep them in the refrigerator and discard after a few days. It is not safe to use herbal infused oils kept at room temperture for any internal use without heating them to pasteurize them or sealing them in a pressure canner.


This herb infused oil has more uses than just soapmaking. If you keep it in the fridge you can add it to your cooking. You can do this with garlic cloves too, not the soap part, just the cooking, but don't keep it indefinitely in the fridge, as there can be the possibility of bacteria growing in there. Hmmmm, garlic is good for you. I wonder how garlic soap would be if made with garlic infused oil. It may be something to try in the future. I hear it is suppose to help restore circulation. I do remember a very elderly gentleman asking me if I made garlic soap, as he was diabetic and wanted to try it. This was many years ago and I had not heard of it before. An interesting idea...


Making Tallow


I use tallow to make soap. It can also be used to make candles. Beef fat is called tallow, pork fat is called lard - prepared in exactly the same way. Tallow is harder than any other common fat and will make a harder soap. Shortening can be used to make vegan soap but the soap won't be as hard as that made with beef fat.

I picked up some beef fat scraps from a butcher nearby and have put them into a pot to render. Rendering is cooking the fat scraps until all the fat has been liquefied, straining it and letting it cool and harden. This separates the fat from other impurities. The fat rises to the top and can be taken off in one hard chunk after it cools. The fat will simmer slowly in this pot for awhile, until I am satisfied that it has cooked long enough.

When it is finished I will strain it through a colander, then through a fine strainer before letting it cool outside on the front porch. If you are cooling it outside, a lid is important. Otherwise you might find little racoon prints in it or you might even find it completely gone! The smell will draw the surrounding animals. I will leave it there throughout the day and bring it in at night. The next morning it will look like this in the pot.


Now that it has cooled I can separate the fat and give the rest to the chickens. They will love it! This is the bottom layer under the pure fat. You will need to make sure none of these impurities get into the tallow.


While the fat simmers, I will go through the rest of my things and make sure I have everything I need to make soap. Tomorrow is a holiday, after all, and there will be nowhere open to buy ingredients.


This is the pure tallow. Isn't it beautiful! It looks just like lard or shortening from the store!


If you have especially smelly fat to render, the addition of a potato to the simmering pot will help to remove odors. A few teaspoons of white vinegar will also help remove odors from the fat.

It can be boiled twice if it is not clean and pure enough the first time. A tablespoon of salt added to the boil will help make it cleaner.

Friday, October 2, 2009

The Cold Cellar


This picture above is not my cellar. It belongs to someone else. Someone with a lot more time, energy and planning than myself. This is my dream, my goal for our cellar.

We have the underground stone root cellar. Its one thing I love about old, old farm houses. I love old farmsteads. The old houses have such character and so many details that are left out of the newly built homes and barns.


Some cold cellars are built into a hillside, separate from the house, but that makes them difficult to access during the hard, cold, stormy winter when the doorway is buried under feet of snow.

Our cold cellar is in the basement, under the front porch to be exact. Our basement is unfinished and unheated throughout the winter and so is the cold cellar.


Cold cellars are also called "root cellars" and are not necessarily used just for roots but are also used to store jars of jams, pickles, etc, as well as tender and tropical bulbs and plants that need to stay above freezing in the winter. It can also be used for a spare fridge for a lot of the year. This is a box of eggs destined for the Salvation Army Soup Kitchen.


The cold cellar needs to be below the frost line to keep the food from freezing, but unheated to keep it cold enough. It also needs to be a bit damp, as most underground cold cellars are.

So many vegetables that we grow in the north can be kept all winter in the right conditions. Unfortunately it is sometimes difficult to provide just the right conditions for every vegetable. Each one can require something different. All you can do is provide what you can and check on them often, removing first the ones that look like they are not going to go the distance. This is where a canner or freezer comes in handy. After the first winter with a cold cellar and your vegetables, you will have a general idea of what you can keep in your cellar and what needs to be kept in a different environment.

Below is a list of a few of the most common vegetables that we have in this area
and how to keep them in a cold cellar. Some of them do not really require "cold" but can be hung and kept dry at room temperature. Very few vegetables will survive being kept damp at room temperature. We try not to use peat, since it is a quickly dwindling natural resource. Some tropicals and tender flowers are also discussed below.

Important Note: Do not store apples (or anything else that produces ethylene gas) in the same room with other vegetables or fruits, It will cause them to ripen and sprout prematurely. Potatoes are especially suseptible. Yes, this
means you cannot store your potatoes and apples in the same room, unfortunately, not if you expect the potatoes to keep very long.

* Carrots: Pack in damp sand. Keep damp and very cold, just above freezing.

* Onions and garlic: Keep dry at room temperature. Separate them until the tops are completely dry then braid the tops and hang the braids in your kitchen for a country decoration or hang in netting to keep dry. You can also dry them and make your own onion/garlic powder. Commercial spices contain filler. Homemade is so much better!

* Most hard skinned winter squash: After curing at room temp, store in a cool but not too cold, dry area with good air circulation. No cold cellar needed for these. Shelves in a closet with openings in the door would be a good place, but not in the bathroom or kitchen where it will be too damp. Store acorn squash in a slightly cooler and moister environment without curing.


* Cabbage: Hang in a damp cold cellar, roots and all, or cut heads, remove loose outer leaves and spread one layer deep on shelves in a damp root cellar. Keep as damp and as close to freezing as possible.

* Rutabagas and Turnips: Cool (not too cold) and dry. Do not wash before storing. You can give Rutabagas a quick, light dip in hot wax to seal them in order to keep them even longer, but they will keep for a few months in the right conditions without the wax.

* Potatoes: Keep just above freezing (40*F). If you wash them after digging,
make sure they are dry before packing in boxes for storage.

* Beets: Cut the tops to 1" and dont cut the root tip off. Store very cold, just
above freezing and very damp.

* Apples: Store very cold, just above freezing and very damp. Do not store with
other vegetables.

I know its hard to find a separate place to keep apples just above freezing.
Perhaps it is possible to close off a small corner with heavy, air tight
plastic. I have considered doing this but have not tried it yet. I may do that
this year, if we buy apples in bulk.


I also store my tender bulbs in the cold cellar. I grow cannas, calla lilies, dahlias, glads and elephant ears. I also plan to overwinter the four o'clocks I grew this year in the cold cellar.


Canna lilies like to be kept quite damp in storage and just above freezing. I have tried several methods of overwintering them. Last year I put the cannas in a single row in a box and set it directly on the stone (we have a field stone cellar). I also wrapped some little dahlias and small cannas in newpaper and piled them in a clothesbasket in the cellar. I lost a few of those so I won't be doing that this year. All the cannas that were in the bottom of the box on the stone survived very well, so I will be keeping all of the cannas and a lot of the other tender bulbs that way this winter. I have read that dahlias do well in a plastic bucket with the lid on, so I will be trying that with some of the dahlias.

This is my best beloved dahlia, 'Keri Blue'.