Tuesday, February 15, 2011

Early, Early Spring Seeding


By this time of the winter, I am usually waiting impatiently for spring. I so want to be digging in the dirt, smelling it and planting things in it! One thing that helps me is planting a few very early seeds. Even though I am still indoors, at least I get to play in the dirt!


Last year I got so impatient that I planted all my tomatoes in February. Big mistake! This year I will wait until April to plant the tomatoes and the peppers.
I did plant a couple of small tomato plants just for early in-house tomatoes for us to eat. We are getting tired of paying for those store bought tomatoes! This is the 'Ailsa Craig' tomato that I planted a couple of weeks ago. It's doing well under lights. By the time it gets too big for the lights and the window, we will have enough sun for it to grow in front of the patio door.
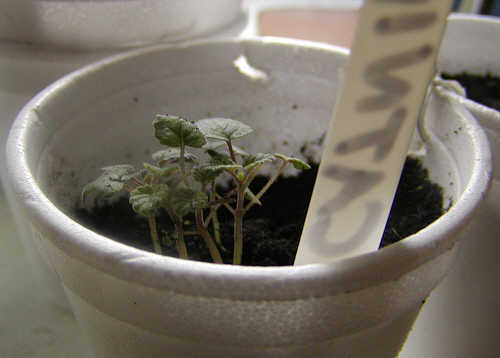


At that time I also planted some catnip for the kitties. It is doing well under the lights.


I am using styrofoam cups simply because I have them left over from a summer pup party. I don't like using them as well as I like
My Newspaper Pots and I don't really approve of using styrofoam at all. I don't think I am going to continue using them for pots as they are tippy and I can't get as many into a container. The newspaper pots work much better.


My helper was right there with me, as she always is. Regardless of where I am or what I am doing in the house, Abby is near, unless she is sound asleep somewhere in a box or basket. If I am sitting down, she is in my lap. I paint with a cat and a canvas in my lap, I compute with a cat and a laptop in my lap. She is fully grown at 1.5 years old but small so she is an indoor cat. Being a tabby, she rules the roost around here and we love her dearly! Even with her small stature, she takes no guff from Buck! lol! She's definitely a "daddy's little girl"!


I am using horizontal blinds, cut into small pieces, as markers. I have done this for more than a decade and have been happy with them. The marker fades outside, but it fades from anything if left out in the weather. I have yet to perfect a long lasting outdoor marker that is easy and affordable. I have used styrofoam cups cut up and they work ok outside if you use a pen and make the letters indented into the material, but the ink still disappears.
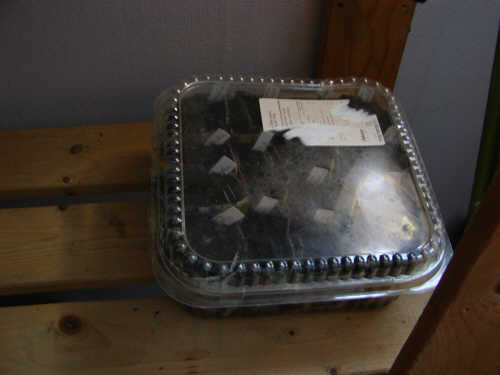


For planting trays I reuse those hard, clear plastic food containers from the grocery store. I plan to use these to grow our own sprouts, as well, which will probably be another post soon. The bottoms need to be water proof and all labels removed from the top so the light can get in. They make excellent seed trays for the newspaper pots. I like reusing "garbage"!


I am not growing as many vegetables this year as I have in years past. We just don't need the food now that there are only the two of us to eat it and my time is so short, with working, gardening and all.


I am growing more of our own grains. I have planted chia, red quinoa and white quinoa already since they have a longer growing season and need the extra time. They are all sprouting now!

The quinoa is the tallest, which is good because it has the longest growing season. I will be offering these seed on my seed site soon, now that I know they germinate well and quickly.


I love setting up my "grow" room and planting things in winter! It was -20c last night and is still -17c this early morning! Will spring never come??

Monday, February 14, 2011

A New Cookbook

I have a new, free e-book for download! It is the "Providence Acres Blog Cookbook" - A Collection Of Recipes & Tips From Our Blog.

You can download it free from the link in the left column.

It is totally free for your use, as are my other books: "Making Organic Soap At Home" and "Making Organic Wine At Home". If you like the books and use them, and you can afford to, please donate to help keep them free.

I am writing a series of "At Home" books for those folks who are on the road to self sufficiency and want to live closer to the land. Most families who have left their jobs and security and are just starting out on their own do not usually have much in the way of material possessions. The very definition of homesteading usually means a lack of material posessions. These people need the help these books might be able to provide and it is for these families that I want to keep them free, however writing a book takes up a lot of my time and effort.

If you want to help with this project and can afford to, please donate towards their use and continuation. You can use the "Donate" button on the download page and go through PayPal, if you wish.

My next book will be: "Keeping a Few chickens At Home". I don't have a publish date as I write in my spare time.

Please let me know if there is an important recipe or tip in the blog that I have ommitted in this book.

Thank you, everyone, for your continued support in this endeavor!

Sunday, February 13, 2011

Easy Moist Pudding Cake & Frosting - Any Flavor


Directions for making any cake mix into a delicious and moist cake.
You can even use those cheap generic cake mixes for this and it will be dense, moist and delicious! Ignore directions on the box.

Recipe:
1 cake mix full size, any standard flavor. Ignore directions on box.
1 standard package of instant pudding mix, flavor to complement the cake mix.
1 cup water or juice to flavor cake
4 eggs
½ vegetable oil

Mix all except the eggs together very well with mixer. Add eggs one at a time, beating well after each addition. Pour into greased cake pans. Bake at 350F following baking times on cake mix box for pan size.

Variations:
- If you don’t have a pudding mix flavor to match the cake mix, use vanilla.
- Banana – add 2 sm ripe bananas with banana cream pudding to yellow cake mix. Reduce oil to ¼ cup
- Black Forest Cake: Cherry chip cake mix with dark choc pudding
- Butter pecan cake and pudding with maple frosting
- White cake mix with pistachio pudding mix and ½ cup coconut added to cake mix.
- Carrot cake mix with vanilla pudding and ½ cup plump raisins added (cream cheese frosting, recipe below).
- Orange Cake: orange juice with white cake mix and orange juice in frosting
- Apple cake: apple juice in cake with 1/2 cup finely chopped apple and apple juice in frosting

**Easy frosting recipe below.


Tips for making a great cake:


- Keeping an apple in the holder with the cake will help to keep the cake moist.
- Use an electric mixer and beat the ingredients together extremely well.
- Insert a toothpick into the center of the cake to see if it is done. If the toothpick comes out clean and dry, the cake is done. I usually stick 2-3 of them into the cake in different places around the center area, just to be sure. If the cake is taken from the oven before it has cooked completely, it will fall flat and sink as it cools.
- A cake that is overcooked, even by a few minutes, will be dry, so watch it carefully at the end.
- Wait until the cake has cooled completely before putting the frosting on. Frosting will melt and run off the cake if the cake is still a little warm. If you are making a layer cake, it will take the upper layer with it.
- Make certain that your oven is calibrated properly. Most electric ovens get hotter over time so that they are baking at about 375F when you put the dial on 350F. If you are mechanically inclined you can fool around with the thermostat inside the oven and adjust it in the right direction a tiny bit. We do this when we get another oven or when our oven is obviously too hot. You will need a good digital or oven thermometer to do this and it takes time. Adjust the thermostat in the oven a tiny bit, then turn the oven on until the light goes out. Use the thermometer to test the temperature in the oven when the light goes off, adjusting the oven thermostat slightly, over and over again until you get it exactly right. It could take an entire day to calibrate your oven, but its worth it! It makes a huge difference in baking to have the oven at the right temperature. It should be a few years before it needs it again, if ever.


Simple Error Proof Frosting - any flavor
Basic ingredients for plain vanilla frosting for a standard large two layer cake:
4 cups powdered icing sugar
1/2 softened fat (butter, shortening, cream cheese)
1 teasp vanilla
water or juice in tiny amounts

Directions: ALL LIQUID IS TO BE ADDED LAST! Combine powdered icing sugar, vanilla and fat in mixer and process until fairly well mixed. Mixture will be dry and crumbly. Put in any desired additions here (see list below). Add water or juice, a tiny amount (1 teaspoon) at a time, mixing well after each addition until frosting has reached the desired consistency. Beat very well on high after all additions are made. If it is too wet and thin, add more sugar slowly.

Variations: All additions are to be added and mixed in well before adding liquid (water or juice) to frosting.
- Replace water with any fruit juice to match the cake
- Maple: add 1/2 cup maple syrup before adding water
- Chocolate: Add 1 cup powdered cocoa before adding water. Decrease powdered icing sugar by 1/2 cup
- Fruit: add 1/2 chopped fruit and mix well, before adding juice or water
- Note: Be careful adding fresh fruit to frosting. Some fruits will turn it brown and need to be refrigerated. Most berries are ok in frosting.

Friday, February 11, 2011

Growing Your Own Medicinal Herbs


I made a decision a few years ago to grow my own medicinal herbs and spices. It's a step on the road to natural self sufficiency. Medicinal herbs can be strong medicine and have to be taken carefully. I am not going to tell you how to use the medicinal herbs since I am not a qualified herbalist but there are a lot of good books out there on the subject and websites as well. One website I have used is "Anne's Remedy". It lists all the medicinal herbs in alphabetical order and tells you what they are for.


They also sell the herb oils, tinctures, teas and so forth but wouldn't you rather just grow your own? It can get a bit expensive buying these things, with postage and all.


I am not recommending that you use medicinal herbs in place of standardized medicine. I still go to the doctor and take the medicines that he gives me, when I need to. (I am usually almost dead by that time and have to be dragged there. It's free here in Canada, but I still hate going, lol). I tell him what natural remedies I am using. I think this is important if you are getting a prescription medicine because some of the natural remedies may react with the prescription drug. I do use the medicinal herbs that I grow, but very carefully and in their weaker form as tea.

I also grow most of my spices but I did not dry them this year. (I just didn't have time, you know... BUILDING FENCES!!! and all.) I threw a few fresh chopped spices into the freezer and have been using those, but this coming year I plan to supply all my dried spice needs, where possible, myself.
I have a lot of thyme that I planted from seed three years ago. I also have oregano, although I want to get some Greek oregano and I have sage, cilantro, mint, lemon mint, basil and lemon basil and rosemary. I never use terragon, so I don't grow it. (We are stuck in a rut and use the same spices all the time.)


I plan to dry all of these this year and keep them in jars in a cool, dark place. Probably the spare room upstairs, since it is unheated in the winter and the basement is too damp. You can see what I do with the mint in a previous post "Using All That Mint". (I have discovered this winter that I like a mint shot in my coffee, as well. I'm going to try that at home :-)

I do wish I could grow cinnimon and nutmeg. Ciinnimon is not that expensive to buy but nutmeg sure is! I use a lot of both in the pumpkin/squash recipes for pie and muffins. If you discover a hardy, short season cinnamon and nutmeg that I can grow, please let me know!

Another thing I want to grow this year is my own ginger. Has anyone grown ginger for drying and grinding? How does it keep in that form? How does it compare to storebought? I'm betting it is a lot more potent! The big question for me is this: Is it worth the time and effort, when my time is so short and I use most of my "effort" already? I need to know.

One thing I am going to do with my herbs this year is make my own herbal tea blends. Not "tea from China" tea , since it doesn't grow here either :-( I drink a lot of green tea and herbal tea blends, especially the mints. I hear that chocolate mint makes a fabulous tea. I have to grow some chocolate mint this year! I might even break down and actually BUY one in the spring! (I tend to avoid those places that sell reasonably priced plants. Too many of them just hop into my cart and insist on following me home!)


Another herb I am going to grow and use this year is stevia. I use too much of the artificial sweetener in tea and want to get away from it. (I know real sugar is healthier, but I don't metabolize simple sugars very well.) If you grow and use stevia, I wouldn't mind some feedback on the taste vs. sweetener and sugar.

I am going to dry these things hanging under the front porch roof where they are out of the sun and get the maximum air flow (and look so "country chic"). This is the mint that I dried last year. It is still hanging out there in -16c temps today. I guess I should have frozen it too. (Time! I had no time!!)


Now that I have these cool new spice jars, I might get adventurous and try new spices, just because I like the way they look in the jar!
For those of you who are interested, I sell a small few medicinal herb and spice seeds in my seed store at The Providence Acres Farm website.